12.13: Conflict Resolution at Work
- Page ID
- 47112
- Describe workplace conflict resolution strategies
While you may not be able to avoid conflict, there are certain strategies you can use to navigate through it with ease. Before we dive into conflict resolution techniques, check out the video below to review sources of conflict and learn about the Thomas-Kilmann conflict mode Instrument (better known as the TKI Model).
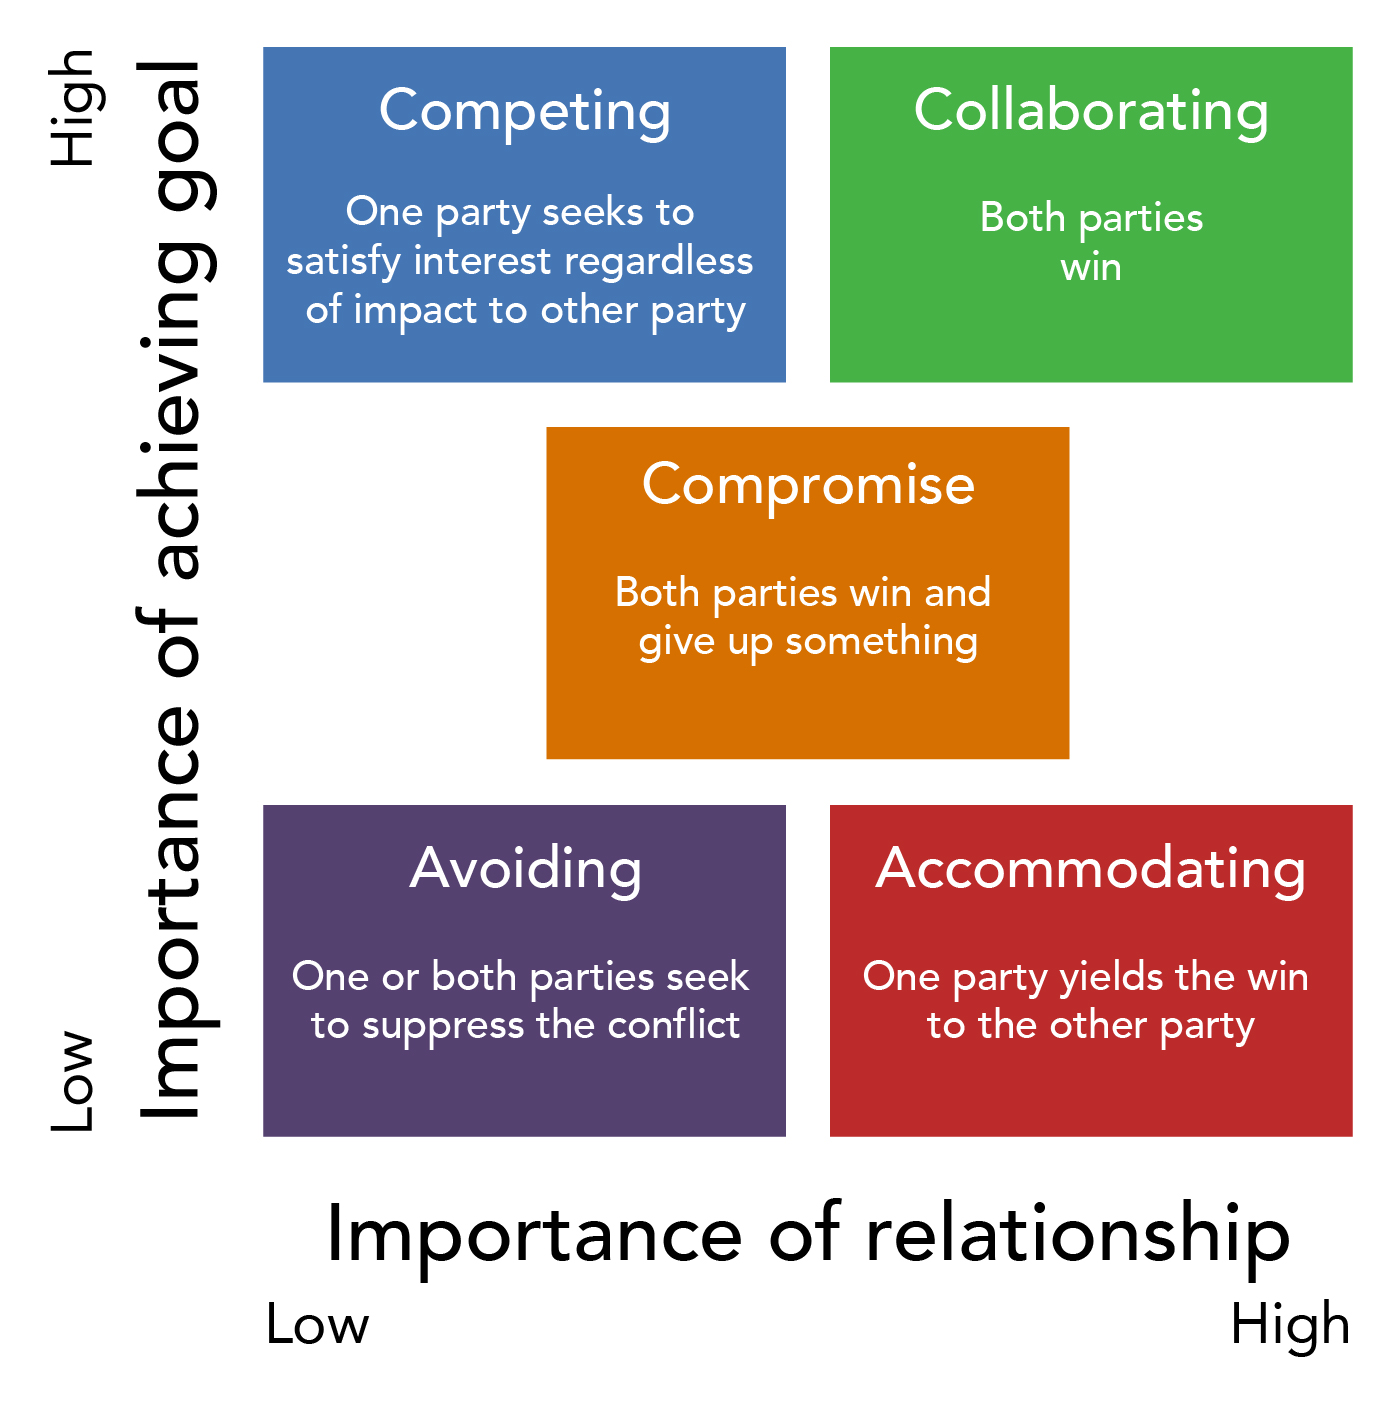
The TKI Model (repeated in Figure \(\PageIndex{1}\)) is a great tool because it helps to promote one-on-one and group conversations around conflict and conflict resolution. It aids organizations in understanding how conflict resolution impacts both interpersonal dynamics as well as team dynamics. Understanding how conflict resolution impacts both the individual and the group will help people determine the best resolution strategy for the betterment of the team.

Figure \(\PageIndex{1}\): The TKI Model of Conflict Resolution. Alternative text for the TKI Model of Conflict Resolution can be found here.
Find the Cause of the Conflict
When dealing with conflict, it is more important to understand the root of the problem than to focus on who is in the right. Instead of looking for a person to blame for the conflict, focus on the central cause of the disagreement. Addressing the root cause of the issue will not only help fix the current conflict but can also help to prevent future problems.
It is important to focus on the behavior, not the individual’s personality. Blaming a person’s personality can create additional conflict. Focusing on behaviors and actions is a more constructive way to approach a conflict and is something an individual is capable of changing. It is not realistic or helpful to focus on personality traits and emotions that cannot be changed.
Take a Step Back
Conflict is oftentimes accompanied by emotions. This is a normal reaction in many situations, however, it can create additional conflict when people let their emotions take control. Before addressing the conflict, take a moment to address any emotional reactions you are experiencing. Addressing your emotions in private before addressing the conflict with others is an effective way to approach the issue from a more objective standpoint. It also allows you time to address any anger or frustration before meeting with your coworkers or supervisors, which will help you to maintain a professional demeanor.
Focus on Effective Communication
 The way in which you communicate through a conflict will greatly influence the outcome. Communicating face-to-face is important to ensure clear communication. Trying to address conflict via email, or even through a phone conversation, leaves room for misinterpretation. Tone and inflection are extremely hard to decipher through text, and can be misconstrued as rude or snarky. Meeting face-to-face allows everyone involved in the conflict to clearly communicate their viewpoints and frustrations.
It may also be a good idea to get the opinion of a third party before addressing the issue (with the exception of conflict with sensitive or personal information that should not be shared). This will provide fresh perspective and help you see the conflict from a different angle.
Take Ownership
Realistically, an individual will not be in the right in every conflict. Taking ownership for misunderstandings and shortcomings and using conflict resolution as an opportunity to learn from mistakes is an important tool. Being able to acknowledge how an individual could have handled things differently is important to strengthening relationships and personal growth.
Finally, it is important to take active steps to learn from the conflict. Determine what could have been done differently to avoid the conflict and find teachable moments that can be used to avoid future conflicts.
Sources
Fey, Jayna. “Resolve Conflicts In The Workplace With These 12 Techniques.” The Digital Project Manager, March 4, 2018.
Contributors and Attributions
- Conflict Resolution at Work. Authored by: Freedom Learning Group. Provided by: Lumen Learning. License: CC BY: Attribution
- Image: TKI Model. Provided by: Lumen Learning. License: CC BY: Attribution
- man and woman holding cups. Authored by: Joshua Ness. Provided by: Unsplash. Located at: unsplash.com/photos/-bEZ_OfWu3Y. License: CC0: No Rights Reserved. License Terms: Unsplash License
- HR Basics: Workplace Conflict. Authored by: Gregg Learning. Located at: https://youtu.be/V79uO74vWfc. License: All Rights Reserved. License Terms: Standard YouTube License


