
9.1: Automating Tasks With Macros
- Page ID
- 150655
This page is a draft and is under active development.
\( \newcommand{\vecs}[1]{\overset { \scriptstyle \rightharpoonup} {\mathbf{#1}} } \)
\( \newcommand{\vecd}[1]{\overset{-\!-\!\rightharpoonup}{\vphantom{a}\smash {#1}}} \)
\( \newcommand{\dsum}{\displaystyle\sum\limits} \)
\( \newcommand{\dint}{\displaystyle\int\limits} \)
\( \newcommand{\dlim}{\displaystyle\lim\limits} \)
\( \newcommand{\id}{\mathrm{id}}\) \( \newcommand{\Span}{\mathrm{span}}\)
( \newcommand{\kernel}{\mathrm{null}\,}\) \( \newcommand{\range}{\mathrm{range}\,}\)
\( \newcommand{\RealPart}{\mathrm{Re}}\) \( \newcommand{\ImaginaryPart}{\mathrm{Im}}\)
\( \newcommand{\Argument}{\mathrm{Arg}}\) \( \newcommand{\norm}[1]{\| #1 \|}\)
\( \newcommand{\inner}[2]{\langle #1, #2 \rangle}\)
\( \newcommand{\Span}{\mathrm{span}}\)
\( \newcommand{\id}{\mathrm{id}}\)
\( \newcommand{\Span}{\mathrm{span}}\)
\( \newcommand{\kernel}{\mathrm{null}\,}\)
\( \newcommand{\range}{\mathrm{range}\,}\)
\( \newcommand{\RealPart}{\mathrm{Re}}\)
\( \newcommand{\ImaginaryPart}{\mathrm{Im}}\)
\( \newcommand{\Argument}{\mathrm{Arg}}\)
\( \newcommand{\norm}[1]{\| #1 \|}\)
\( \newcommand{\inner}[2]{\langle #1, #2 \rangle}\)
\( \newcommand{\Span}{\mathrm{span}}\) \( \newcommand{\AA}{\unicode[.8,0]{x212B}}\)
\( \newcommand{\vectorA}[1]{\vec{#1}} % arrow\)
\( \newcommand{\vectorAt}[1]{\vec{\text{#1}}} % arrow\)
\( \newcommand{\vectorB}[1]{\overset { \scriptstyle \rightharpoonup} {\mathbf{#1}} } \)
\( \newcommand{\vectorC}[1]{\textbf{#1}} \)
\( \newcommand{\vectorD}[1]{\overrightarrow{#1}} \)
\( \newcommand{\vectorDt}[1]{\overrightarrow{\text{#1}}} \)
\( \newcommand{\vectE}[1]{\overset{-\!-\!\rightharpoonup}{\vphantom{a}\smash{\mathbf {#1}}}} \)
\( \newcommand{\vecs}[1]{\overset { \scriptstyle \rightharpoonup} {\mathbf{#1}} } \)
\(\newcommand{\longvect}{\overrightarrow}\)
\( \newcommand{\vecd}[1]{\overset{-\!-\!\rightharpoonup}{\vphantom{a}\smash {#1}}} \)
\(\newcommand{\avec}{\mathbf a}\) \(\newcommand{\bvec}{\mathbf b}\) \(\newcommand{\cvec}{\mathbf c}\) \(\newcommand{\dvec}{\mathbf d}\) \(\newcommand{\dtil}{\widetilde{\mathbf d}}\) \(\newcommand{\evec}{\mathbf e}\) \(\newcommand{\fvec}{\mathbf f}\) \(\newcommand{\nvec}{\mathbf n}\) \(\newcommand{\pvec}{\mathbf p}\) \(\newcommand{\qvec}{\mathbf q}\) \(\newcommand{\svec}{\mathbf s}\) \(\newcommand{\tvec}{\mathbf t}\) \(\newcommand{\uvec}{\mathbf u}\) \(\newcommand{\vvec}{\mathbf v}\) \(\newcommand{\wvec}{\mathbf w}\) \(\newcommand{\xvec}{\mathbf x}\) \(\newcommand{\yvec}{\mathbf y}\) \(\newcommand{\zvec}{\mathbf z}\) \(\newcommand{\rvec}{\mathbf r}\) \(\newcommand{\mvec}{\mathbf m}\) \(\newcommand{\zerovec}{\mathbf 0}\) \(\newcommand{\onevec}{\mathbf 1}\) \(\newcommand{\real}{\mathbb R}\) \(\newcommand{\twovec}[2]{\left[\begin{array}{r}#1 \\ #2 \end{array}\right]}\) \(\newcommand{\ctwovec}[2]{\left[\begin{array}{c}#1 \\ #2 \end{array}\right]}\) \(\newcommand{\threevec}[3]{\left[\begin{array}{r}#1 \\ #2 \\ #3 \end{array}\right]}\) \(\newcommand{\cthreevec}[3]{\left[\begin{array}{c}#1 \\ #2 \\ #3 \end{array}\right]}\) \(\newcommand{\fourvec}[4]{\left[\begin{array}{r}#1 \\ #2 \\ #3 \\ #4 \end{array}\right]}\) \(\newcommand{\cfourvec}[4]{\left[\begin{array}{c}#1 \\ #2 \\ #3 \\ #4 \end{array}\right]}\) \(\newcommand{\fivevec}[5]{\left[\begin{array}{r}#1 \\ #2 \\ #3 \\ #4 \\ #5 \\ \end{array}\right]}\) \(\newcommand{\cfivevec}[5]{\left[\begin{array}{c}#1 \\ #2 \\ #3 \\ #4 \\ #5 \\ \end{array}\right]}\) \(\newcommand{\mattwo}[4]{\left[\begin{array}{rr}#1 \amp #2 \\ #3 \amp #4 \\ \end{array}\right]}\) \(\newcommand{\laspan}[1]{\text{Span}\{#1\}}\) \(\newcommand{\bcal}{\cal B}\) \(\newcommand{\ccal}{\cal C}\) \(\newcommand{\scal}{\cal S}\) \(\newcommand{\wcal}{\cal W}\) \(\newcommand{\ecal}{\cal E}\) \(\newcommand{\coords}[2]{\left\{#1\right\}_{#2}}\) \(\newcommand{\gray}[1]{\color{gray}{#1}}\) \(\newcommand{\lgray}[1]{\color{lightgray}{#1}}\) \(\newcommand{\rank}{\operatorname{rank}}\) \(\newcommand{\row}{\text{Row}}\) \(\newcommand{\col}{\text{Col}}\) \(\renewcommand{\row}{\text{Row}}\) \(\newcommand{\nul}{\text{Nul}}\) \(\newcommand{\var}{\text{Var}}\) \(\newcommand{\corr}{\text{corr}}\) \(\newcommand{\len}[1]{\left|#1\right|}\) \(\newcommand{\bbar}{\overline{\bvec}}\) \(\newcommand{\bhat}{\widehat{\bvec}}\) \(\newcommand{\bperp}{\bvec^\perp}\) \(\newcommand{\xhat}{\widehat{\xvec}}\) \(\newcommand{\vhat}{\widehat{\vvec}}\) \(\newcommand{\uhat}{\widehat{\uvec}}\) \(\newcommand{\what}{\widehat{\wvec}}\) \(\newcommand{\Sighat}{\widehat{\Sigma}}\) \(\newcommand{\lt}{<}\) \(\newcommand{\gt}{>}\) \(\newcommand{\amp}{&}\) \(\definecolor{fillinmathshade}{gray}{0.9}\)By the end of this section, you will be able to:
- Define and describe the purpose of a macro in Excel.
- Record a macro using the Macro Recorder.
- Assign a macro to a button or shape for easy access.
- Save and enable a macro-enabled workbook (
.xlsmfile). - View and make simple edits to a recorded macro using the VBA editor.
Automating Repetitive Tasks
Many business professionals spend a large portion of their time performing the same steps in Excel—formatting reports, cleaning up data, or generating charts every week or month. Excel’s Macro Recorder can automate these repetitive tasks. A macro is a set of recorded actions that Excel can repeat with a single click.
Instead of performing the same steps over and over, you can record the process once, save it as a macro, and run it whenever needed. For example, you might create a macro that formats a worksheet by applying bold headings, resizing columns, and adding borders—all automatically.
Macros can be recorded without any coding knowledge using the Macro Recorder, or they can be edited with Visual Basic for Applications (VBA) for more advanced customization.
Accessing the Developer Tab
Before you can record a macro, you need to make sure the Developer tab is visible. This tab contains all the tools for creating and managing macros.
- Click File → Options → Customize Ribbon.
- On the right side, check the box next to Developer.
- Click OK to save changes.
The Developer tab will now appear on the ribbon (Figure 10.1.1)

Figure 10.1.1
Recording a Macro
Once the Developer tab is visible, you can record your first macro.
- On the Developer tab, click Record Macro.
- In the dialog box that appears, enter a macro name (no spaces allowed, e.g., FormatReport).
- Optionally, assign a shortcut key (e.g., Ctrl+Shift+R).
- Choose where to store the macro:
- This Workbook (default) to keep it within your current file.
- Personal Macro Workbook to make it available in all workbooks.
- Click OK to begin recording.
Now, perform the actions you want Excel to remember (for example: bold headers, change font size, apply borders). When finished, click Stop Recording on the Developer tab (Figure 10.1.3)

Figure 10.1.2

Figure 10.1.3
Assigning a Macro to a Button
After recording, you can make running your macro easy by assigning it to a button or shape.
- Go to the Developer tab and click Insert in the Controls group, then select Button (Form Control).
- Draw the button on your worksheet by clicking and dragging.
- The Assign Macro dialog box will appear automatically—select your macro (e.g., FormatReport) and click OK.
- Right-click the button and select Edit Text to change the label to something more descriptive, such as "Format Report."
Now, clicking the button will automatically perform your recorded steps (Figure 10.1.4).
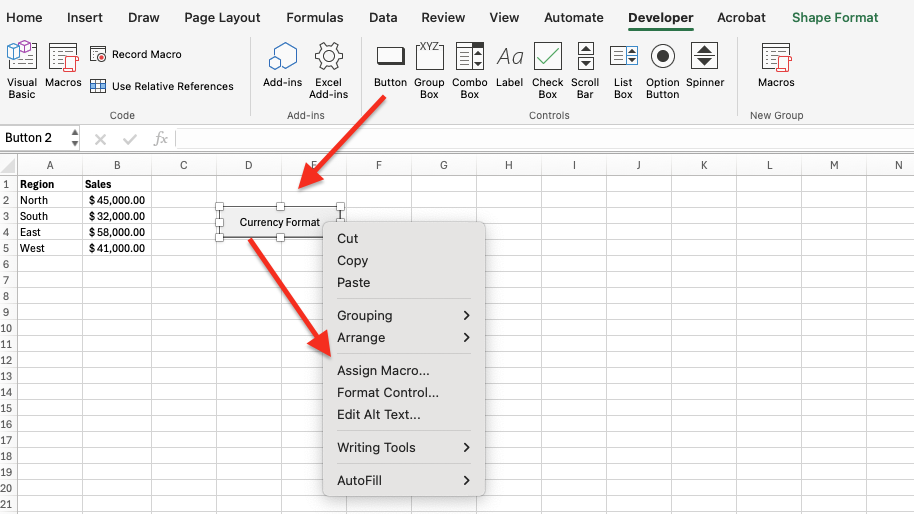
Figure 10.1.4
Saving and Enabling Macros
Macros can only run in workbooks saved as Macro-Enabled Workbooks (.xlsm).
When you attempt to save, choose File → Save As, and from the Save as type dropdown, select Excel Macro-Enabled Workbook (*.xlsm) (Figure 10.1.5).
If you open a workbook that contains macros, Excel may display a security warning prompting you to enable content. Click Enable Content to allow the macros to run.

Figure 10.1.5

Figure 10.1.6
Viewing and Editing a Macro
Every recorded macro is written in a simple programming language called Visual Basic for Applications (VBA). You don’t need to know how to code to record a macro, but viewing your code can help you understand how Excel interprets your actions.
To view your macro:
- Go to the Developer tab and click Macros.
- Select your macro name and click Edit.
The VBA Editor will open, showing the underlying code (Figure 10.1.7).
Each action you perform while recording appears as a line of VBA code.

Figure 10.1.7
Summary
Macros are one of Excel’s most powerful time-saving tools because they automate repetitive or routine tasks. Instead of performing the same steps manually—such as formatting headers, creating charts, or updating reports—users can record those actions once and replay them at any time with a single click. This process not only speeds up work but also ensures consistency and accuracy across reports.
At a technical level, every recorded macro is written in Visual Basic for Applications (VBA), the programming language that underlies Microsoft Office. When you use the Macro Recorder, Excel automatically converts each of your actions into a sequence of VBA commands. These commands can be reviewed or edited to make small customizations—such as applying conditional formatting, looping through data, or adding user prompts. For beginners, this provides a gentle introduction to programming logic without requiring you to write code from scratch.
Macros are especially valuable in business and data management settings. For instance, analysts often receive monthly data files that need the same cleaning and formatting before analysis. By creating a macro that handles these steps automatically—deleting blank rows, applying number formats, or generating charts—employees can focus on interpreting results rather than performing repetitive setup work. This type of automation supports productivity, data integrity, and more efficient reporting cycles.
However, it’s important to understand that macros can contain executable code, so Excel protects users by disabling them in new workbooks until permission is granted. Always save macro projects as macro-enabled workbooks (.xlsm) and enable content only from trusted sources.
In this section, you learned how to:
- Access and use the Developer tab to record and manage macros.
- Record a macro using the Macro Recorder and assign it to a button or shape.
- Save the file as a macro-enabled workbook and enable macros securely.
- View and edit recorded macros in the VBA Editor for simple customizations.
By mastering these techniques, you gain a foundational understanding of how automation can enhance business efficiency. Macros serve as the gateway to more advanced Excel capabilities like Power Query and VBA programming, both of which allow for dynamic data transformation and customizable solutions that scale with organizational needs.