Business LibreTexts

2.12: Google Docs

  • Page ID
    46090
  • \( \newcommand{\vecs}[1]{\overset { \scriptstyle \rightharpoonup} {\mathbf{#1}} } \)

    \( \newcommand{\vecd}[1]{\overset{-\!-\!\rightharpoonup}{\vphantom{a}\smash {#1}}} \)

    \( \newcommand{\id}{\mathrm{id}}\) \( \newcommand{\Span}{\mathrm{span}}\)

    ( \newcommand{\kernel}{\mathrm{null}\,}\) \( \newcommand{\range}{\mathrm{range}\,}\)

    \( \newcommand{\RealPart}{\mathrm{Re}}\) \( \newcommand{\ImaginaryPart}{\mathrm{Im}}\)

    \( \newcommand{\Argument}{\mathrm{Arg}}\) \( \newcommand{\norm}[1]{\| #1 \|}\)

    \( \newcommand{\inner}[2]{\langle #1, #2 \rangle}\)

    \( \newcommand{\Span}{\mathrm{span}}\)

    \( \newcommand{\id}{\mathrm{id}}\)

    \( \newcommand{\Span}{\mathrm{span}}\)

    \( \newcommand{\kernel}{\mathrm{null}\,}\)

    \( \newcommand{\range}{\mathrm{range}\,}\)

    \( \newcommand{\RealPart}{\mathrm{Re}}\)

    \( \newcommand{\ImaginaryPart}{\mathrm{Im}}\)

    \( \newcommand{\Argument}{\mathrm{Arg}}\)

    \( \newcommand{\norm}[1]{\| #1 \|}\)

    \( \newcommand{\inner}[2]{\langle #1, #2 \rangle}\)

    \( \newcommand{\Span}{\mathrm{span}}\) \( \newcommand{\AA}{\unicode[.8,0]{x212B}}\)

    \( \newcommand{\vectorA}[1]{\vec{#1}}      % arrow\)

    \( \newcommand{\vectorAt}[1]{\vec{\text{#1}}}      % arrow\)

    \( \newcommand{\vectorB}[1]{\overset { \scriptstyle \rightharpoonup} {\mathbf{#1}} } \)

    \( \newcommand{\vectorC}[1]{\textbf{#1}} \)

    \( \newcommand{\vectorD}[1]{\overrightarrow{#1}} \)

    \( \newcommand{\vectorDt}[1]{\overrightarrow{\text{#1}}} \)

    \( \newcommand{\vectE}[1]{\overset{-\!-\!\rightharpoonup}{\vphantom{a}\smash{\mathbf {#1}}}} \)

    \( \newcommand{\vecs}[1]{\overset { \scriptstyle \rightharpoonup} {\mathbf{#1}} } \)

    \( \newcommand{\vecd}[1]{\overset{-\!-\!\rightharpoonup}{\vphantom{a}\smash {#1}}} \)

    \(\newcommand{\avec}{\mathbf a}\) \(\newcommand{\bvec}{\mathbf b}\) \(\newcommand{\cvec}{\mathbf c}\) \(\newcommand{\dvec}{\mathbf d}\) \(\newcommand{\dtil}{\widetilde{\mathbf d}}\) \(\newcommand{\evec}{\mathbf e}\) \(\newcommand{\fvec}{\mathbf f}\) \(\newcommand{\nvec}{\mathbf n}\) \(\newcommand{\pvec}{\mathbf p}\) \(\newcommand{\qvec}{\mathbf q}\) \(\newcommand{\svec}{\mathbf s}\) \(\newcommand{\tvec}{\mathbf t}\) \(\newcommand{\uvec}{\mathbf u}\) \(\newcommand{\vvec}{\mathbf v}\) \(\newcommand{\wvec}{\mathbf w}\) \(\newcommand{\xvec}{\mathbf x}\) \(\newcommand{\yvec}{\mathbf y}\) \(\newcommand{\zvec}{\mathbf z}\) \(\newcommand{\rvec}{\mathbf r}\) \(\newcommand{\mvec}{\mathbf m}\) \(\newcommand{\zerovec}{\mathbf 0}\) \(\newcommand{\onevec}{\mathbf 1}\) \(\newcommand{\real}{\mathbb R}\) \(\newcommand{\twovec}[2]{\left[\begin{array}{r}#1 \\ #2 \end{array}\right]}\) \(\newcommand{\ctwovec}[2]{\left[\begin{array}{c}#1 \\ #2 \end{array}\right]}\) \(\newcommand{\threevec}[3]{\left[\begin{array}{r}#1 \\ #2 \\ #3 \end{array}\right]}\) \(\newcommand{\cthreevec}[3]{\left[\begin{array}{c}#1 \\ #2 \\ #3 \end{array}\right]}\) \(\newcommand{\fourvec}[4]{\left[\begin{array}{r}#1 \\ #2 \\ #3 \\ #4 \end{array}\right]}\) \(\newcommand{\cfourvec}[4]{\left[\begin{array}{c}#1 \\ #2 \\ #3 \\ #4 \end{array}\right]}\) \(\newcommand{\fivevec}[5]{\left[\begin{array}{r}#1 \\ #2 \\ #3 \\ #4 \\ #5 \\ \end{array}\right]}\) \(\newcommand{\cfivevec}[5]{\left[\begin{array}{c}#1 \\ #2 \\ #3 \\ #4 \\ #5 \\ \end{array}\right]}\) \(\newcommand{\mattwo}[4]{\left[\begin{array}{rr}#1 \amp #2 \\ #3 \amp #4 \\ \end{array}\right]}\) \(\newcommand{\laspan}[1]{\text{Span}\{#1\}}\) \(\newcommand{\bcal}{\cal B}\) \(\newcommand{\ccal}{\cal C}\) \(\newcommand{\scal}{\cal S}\) \(\newcommand{\wcal}{\cal W}\) \(\newcommand{\ecal}{\cal E}\) \(\newcommand{\coords}[2]{\left\{#1\right\}_{#2}}\) \(\newcommand{\gray}[1]{\color{gray}{#1}}\) \(\newcommand{\lgray}[1]{\color{lightgray}{#1}}\) \(\newcommand{\rank}{\operatorname{rank}}\) \(\newcommand{\row}{\text{Row}}\) \(\newcommand{\col}{\text{Col}}\) \(\renewcommand{\row}{\text{Row}}\) \(\newcommand{\nul}{\text{Nul}}\) \(\newcommand{\var}{\text{Var}}\) \(\newcommand{\corr}{\text{corr}}\) \(\newcommand{\len}[1]{\left|#1\right|}\) \(\newcommand{\bbar}{\overline{\bvec}}\) \(\newcommand{\bhat}{\widehat{\bvec}}\) \(\newcommand{\bperp}{\bvec^\perp}\) \(\newcommand{\xhat}{\widehat{\xvec}}\) \(\newcommand{\vhat}{\widehat{\vvec}}\) \(\newcommand{\uhat}{\widehat{\uvec}}\) \(\newcommand{\what}{\widehat{\wvec}}\) \(\newcommand{\Sighat}{\widehat{\Sigma}}\) \(\newcommand{\lt}{<}\) \(\newcommand{\gt}{>}\) \(\newcommand{\amp}{&}\) \(\definecolor{fillinmathshade}{gray}{0.9}\)
    Learning Objectives
    • Use Google Docs to create a visually appealing and accessible document

    Working in Google Docs is similar to working in Microsoft Word. The only requirement is that you need a Google login to save and share your documents. This page provides guidance in how to use key features needed to create your business communication in Google Docs. If you can envision the page layout, there is a way for the software to do it. If the instructions are not found below, you can be certain someone has made a YouTube tutorial of just what you want to do.

    Getting Started in Google Docs

    Thumbnail for the embedded element "How to create a document in Google Drive"

    A YouTube element has been excluded from this version of the text. You can view it online here: http://pb.libretexts.org/bcsfm/?p=116

    Line and Paragraph Spacing in Google Docs

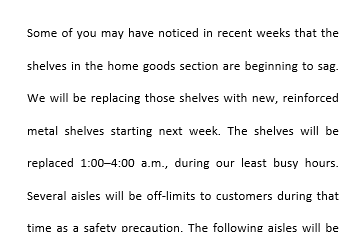
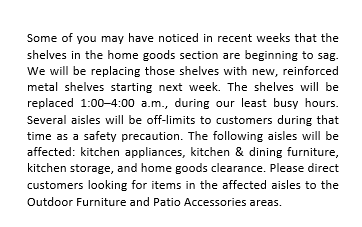
    Business communications, unlike most college or high school writing, use single line spacing, as seen in the images below. Documents use a solid alignment left. The alignment along the right may be blocked, as seen or ragged.

    Avoid Try
     

    A section of text with 2.0 line spacing.

    2.0 line spacing

    A section of text with 1.0 line spacing.


    1.0 spacing

    Change How Paragraphs Look

    You can edit the text, paragraphs, spacing, and font using the toolbar bar at the top of a document.

    1. On your computer, open a document in Google Docs.
    2. Select the lines you want to change.
    3. Click Format > Linespacing.
    4. Select a line spacing option.
    Practice Question

     Headers and Footers

    Headers and footers are the top and bottom sections of the document respectively. They are separate sections from the main document, and are often used to hold footnotes, page numbers, titles, and other information.

    Your company likely has conventions and rules in place for the content of headers and footers and also for where page numbers are to be placed. There are, a few standard guidelines to note:

    • Page numbers go in the header or footer. Once you decide where to put the page number, Word will keep track of it for you.
    • Business letters do not have headers, and they get page numbers only if they run to three or more pages.
    • Footers containing page numbers can start on the first page.
    • For headers and footers in reports, see Module 6.

    Adding Headers, Footers & Page Numbers

    In Google Docs, you can also add dates, titles, or names to every page in a document using headers and footers.

    Add or change headers & footers:
    1. Open a document in Google Docs
    2. Click Insert > Header & page number
    3. Choose Header or Footer
    4. Enter text into the header or footer

    If you want the header or footer on the first page to be different different from the other pages, check Different first page header/footer. This option is only available for the first page; you can’t create a unique header or footer for each page.

    To add page numbers as your header or footer, select Page number in the dropdown menu instead of Header or Footer.

    Spell Check and Grammar Check

    Google Docs’ Grammar Check is integrated with the Spell Check function. The Grammar Check feature underlines words that the application’s engine tags as possible grammatical errors. For example, the Grammar Check will likely underline “its” if the engine thinks you typed the wrong form of the word in the context of the sentence. Open the “Did You Mean…” dialog box for the word, then correct the word if a correction is warranted. The Spell Check function works in the same way as in Word for misspellings, except that correct spellings of the word are presented in the Change Spelling To dialog box.

    Sentence Length

    Earlier in this module concise writing was emphasized. Google docs has a feature that helps track the lengths of sentences.

    You can open the word counter in two different ways:

    • Click on the tab at the top of the page titled Tools. Find Word Count in the drop-down menu and click on it.
    • Use a keyboard shortcut. For PC users, press Ctrl+Shift+C. For Mac users, press Command+Shift+C

    Once you’ve opened the word counter, a dialogue box will appear listing the number of pages, words, characters, and characters excluding spaces in your document.

    Contributors and Attributions

    CC licensed content, Original
    • Google Docs. Authored by: Susan Kendall. Provided by: Lumen Learning. License: CC BY: Attribution
    CC licensed content, Shared previously

    This page titled 2.12: Google Docs is shared under a CC BY 4.0 license and was authored, remixed, and/or curated by Nina Burokas via source content that was edited to the style and standards of the LibreTexts platform.