
12.2: Decision Making Tools
- Page ID
- 48746
Learning Objectives
- Discuss decision making tools
One thing almost everyone has in common is that we all want to make good decisions. That’s been the motivation of many a decision making tool. Over time, people have created and refined tools for every type of decision.
Almost all charts, diagrams and reports lend themselves to decision making in one way or another. But here in this section, we’re going to take a look at some of the tools that are most specifically devoted to the decision making process.
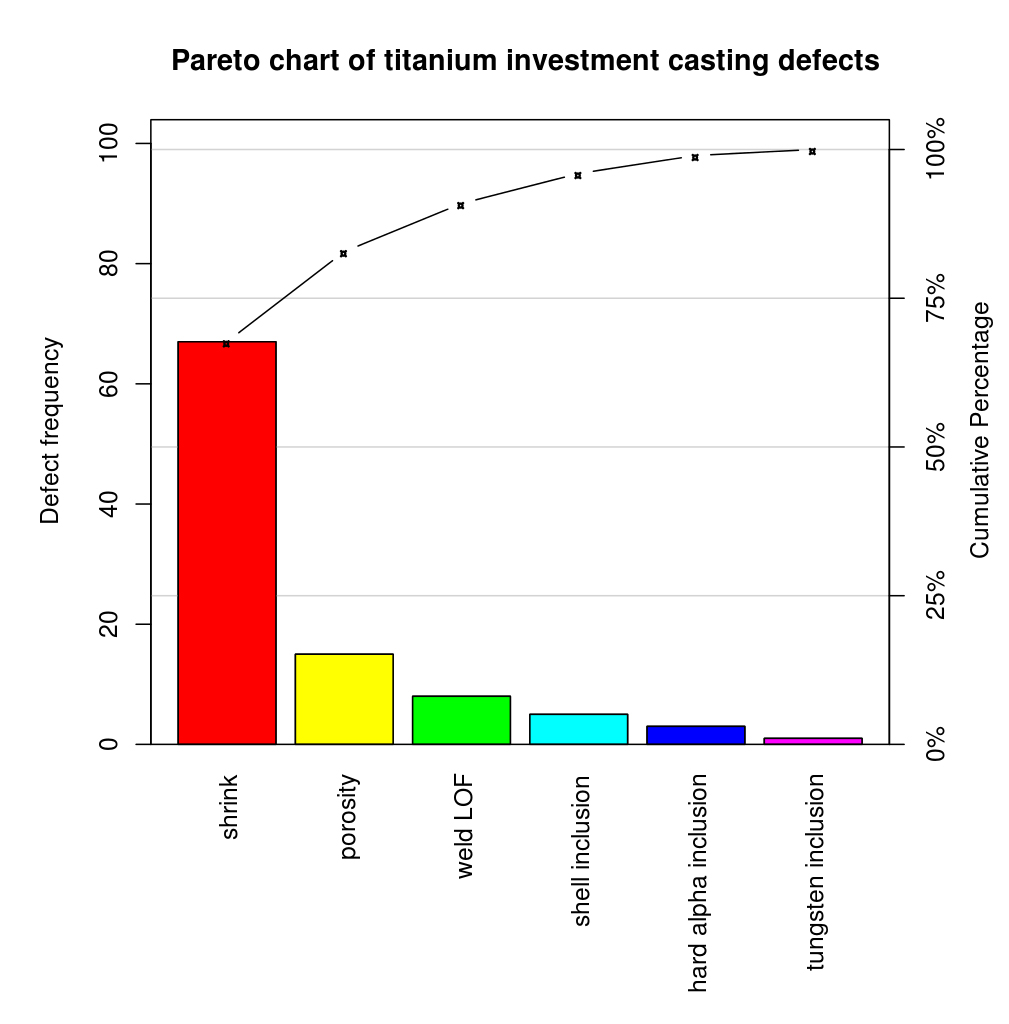
Pareto Diagram
What it does for you: It identifies beneficial opportunities and issues.
A Pareto chart contains both bars and a line graph, where individual values are represented in descending order by bars, and the cumulative total is represented by the line. The chart below outlines titanium investment casting defects. The chart is meant to highlight the most important among a list of factors. The bar chart is the frequency of occurrence, and the line graph shows the cumulative percentage of time these issues occur. Looking at this bar chart, if we wanted to decrease titanium investment casting defects by 80%, we’d need to tackle the first two issues on the chart. The Pareto chart helps you define and tackle the issues that have the most impact on your problem.
Cause and Effect or Ishikawa Diagram
What It Does For You: Helps you hone in on the exact cause of an issue.
As you can see from the cause and effect diagram below (or fishbone diagram, because it looks very much like the bones of a fish), the user needs to list all the possible causes of a particular issue, by category. Each category is a “bone” of the fish. The issue is listed in the fish’s head. In this instance, the group is looking at why so much staff is required for a particular process. The answers are divided into categories, like “policies” and “procedures” below.
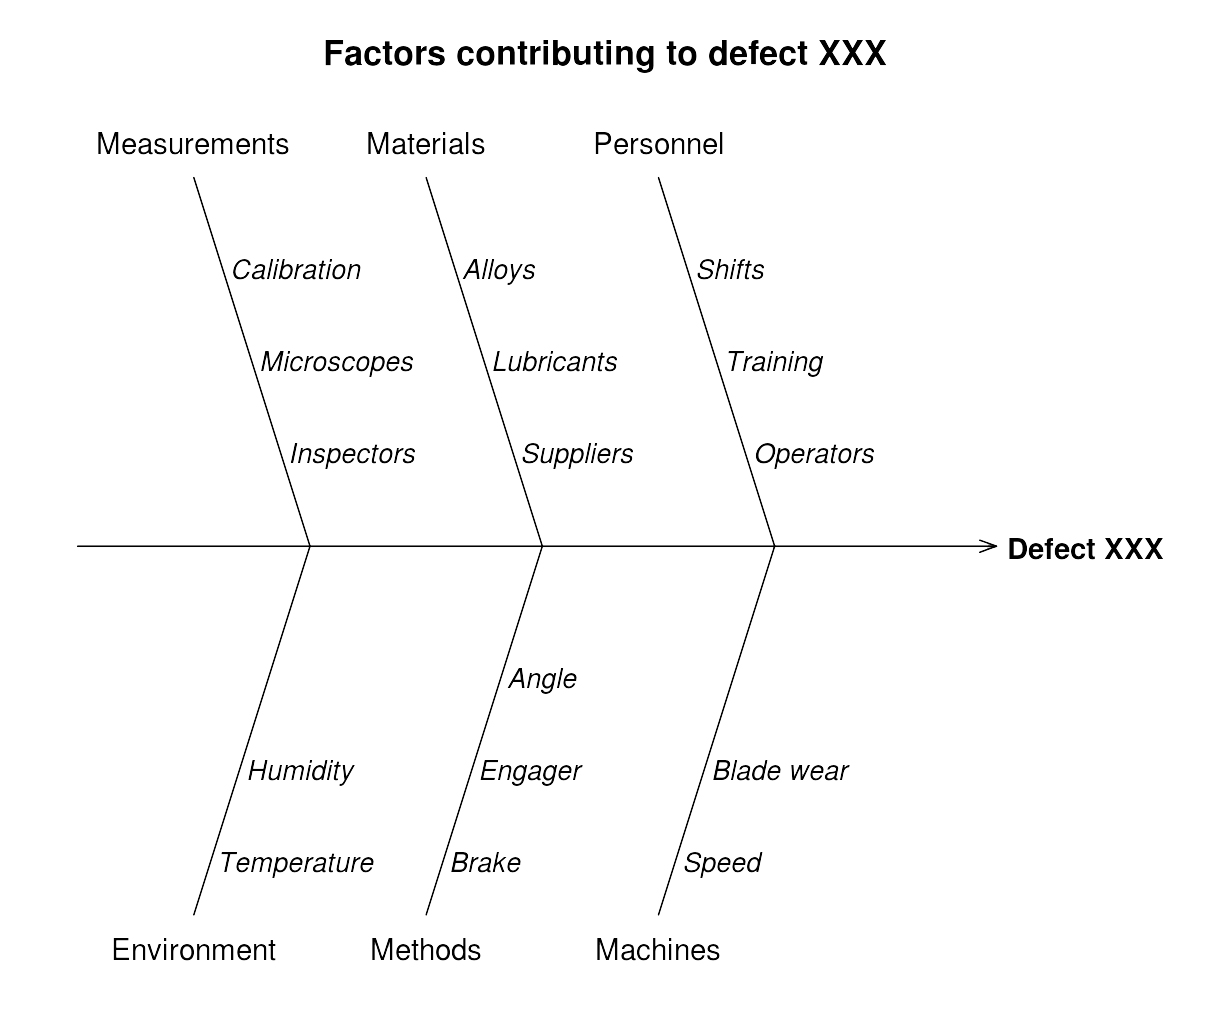
This is commonly used with product design and quality issues, and, as a very visual brainstorming tool, can spark many more ideas for cause/effect issues. On the other hand, bigger issues can start to look cluttered, and interrelationships between causes are hard to identify using this method.
Feasibility Reporting
What it does for you: It lets you know the rate of return on the investment of your project.
Now we’re doing math! (It was inevitable). Feasibility reporting, packed with things like cost-benefit analysis and payback calculations, allows an organization to see all the details of a particular project: when it will start paying back, what the rate of return is on the investment, and so on.
Benefit cost ratio and payback are just a portion of a feasibility report, but this short video shows you the kind of information you’re likely to see and thus, the kinds of decisions it can help you make.
SWOT Analysis
 What it does for you: Helps with strategic planning and decision making.
SWOT stands for strengths, weaknesses, opportunities and threats. SWOT analysis helps you identify the internal strengths and weaknesses of your organization that give you an advantage over others of your kind, and reminds you to look for external opportunities and threats at the same time. It helps an organization identify its objectives and determine which environmental and non-environmental factors are favorable to that success.
This sample SWOT analysis shows the considerations of a particular organization as they went through their strategic planning process.
A SWOT analysis can be used any time a business or individual wants to determine if a particular objective is achievable. Limitations of the SWOT analysis have also been noted, chief among them that the list weighs heavily on perception rather than actual assessment of strengths and weaknesses.
Decision Making Diagrams
What they do for you: They help you see all the alternatives and the associated costs.

The decision making diagram allows you to map out all the possible alternatives to each decision, their costs and even chances of success or failure. In the diagram above, an individual is trying to decide between Vendor 1 and Vendor 2. As you can see in the diagram, Vendor 2’s probability of failure is only 20%, at a cost of $2,400, but would have an impact of $12,000 total, compared with Vendor 1’s $10,000 total impact in the case of failure. Looks like Vendor 1 is a bigger risk with a bigger payoff. Which would you choose?
Decision Making Software
What it does for you: Allows for collaborative decision making and parsing large amounts of data.
There are a variety of decision making software solutions on the market today to help in any situation you might find yourself in. These software solutions allow for collaborative decision making, analysis and reporting of substantial amounts of data.
Vroom-Yetton-Jago Decision Making Model[1]
What it does for you: Helps you figure out the best method to make a decision and who to involve.
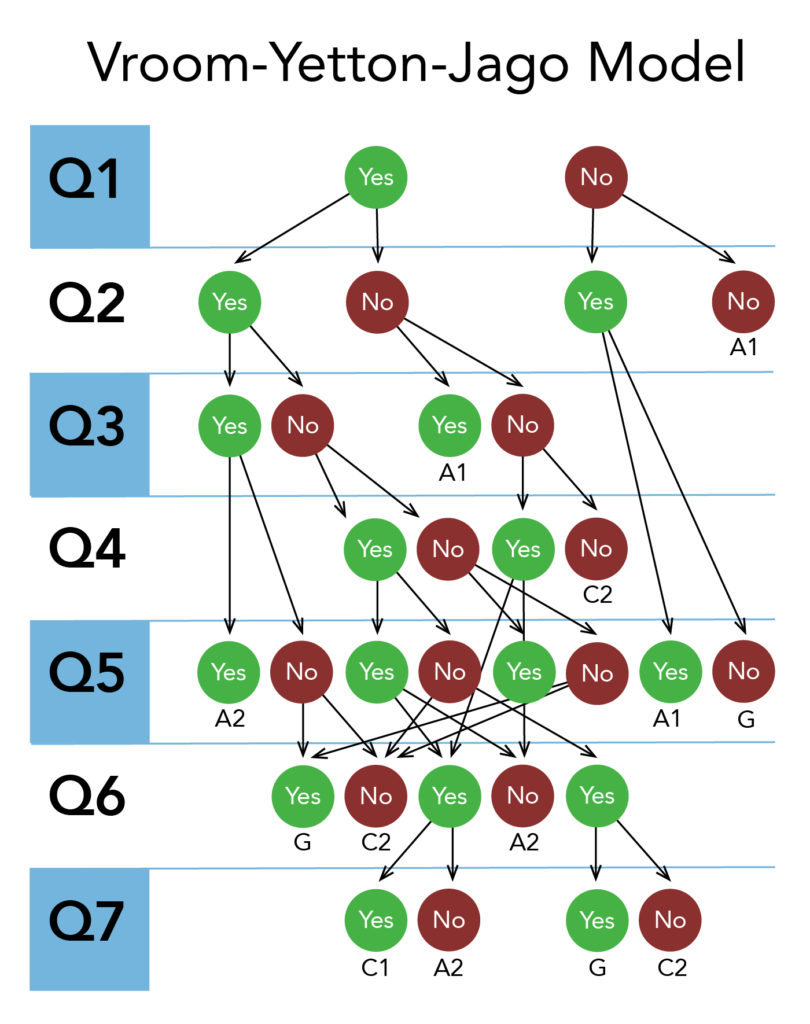 Vroom, Yetton, and Jago created a decision model to help you decide how you were going to make a decision. Should you make a decision individually or assemble the group and make a decision together? These are the questions you should ask yourself, according to Victor Vroom and his compatriots:
- Is the quality of the decision important?
- Is team commitment important for the decision?
- Do you have enough information to make the decision on your own?
- Is the problem well-structured?
- Would the team support you if you made the decision alone?
- Does the team share the organizational goals?
- Is conflict among the team over the decision likely?
Note the significance of the annotations on the chart:
- Autocratic (A1): The leader makes the decision by himself using existing information without any communication with the team.
- Autocratic (A2): The leader consults with team members to get information, but makes the decision by himself or herself without informing the group.
- Consultative (C1): The leader consults the team members to get their opinion about the situation, but he or she makes the decision for themselves.
- Consultative (C2): The leader consults the team members seeking opinions and suggestions, but he or she makes the decision for himself or herself. In this type of leadership style, the leader is open to suggestions and ideas.
- Collaborative (G): The leader shares the decision making process with team members. He or she supports the team in making the decision and finding an answer that everyone agrees on.
The model doesn’t allow for the personality characteristics of the leader, allow for large group use, or provide questions that are precise enough. That said, it’s very flexible and allows the leader the ability to make a good decision in a variety of different situations. It can also be shared and duplicated.
PRactice Question
There are many more tools out there, ranging from complex software to back-of-the-napkin “T charts” that help an individual weigh the pros and cons of any given situation. The idea here is to understand that you don’t have to go into the decision making process alone and confused – there are tools and processes that can help you make decisions the right way!
- Vroom, Victor H., and Philip W. Yetton. Leadership and Decision-Making. Pittsburgh, PA: University of Pittsburgh Press, 1973. ↵
Contributors and Attributions
- Decision Making Tools. Authored by: Freedom Learning Group. Provided by: Lumen Learning. License: CC BY: Attribution
- Image: Decision Making Diagrams. Provided by: Lumen Learning. License: CC BY: Attribution
- Image: Vroom-Yetton-Jago Model. Provided by: Lumen Learning. License: CC BY: Attribution
- Pareto chart. Authored by: Daniel Penfield. Provided by: Wikimedia Commons. Located at: https://commons.wikimedia.org/wiki/File:Pareto_chart_of_titanium_investment_casting_defects.svg. License: CC BY-SA: Attribution-ShareAlike
- Cause and effect diagram. Authored by: Daniel Penfield. Provided by: Wikimedia Commons. Located at: https://commons.wikimedia.org/wiki/File:Cause_and_effect_diagram_for_defect_XXX.svg. License: CC BY-SA: Attribution-ShareAlike
- SWOT Analysis. Provided by: Lumen Learning. Located at: https://courses.lumenlearning.com/wmopen-introductiontobusiness/chapter/introduction-to-planning/. License: CC BY: Attribution
- Benefit Cost Ratio and Payback. Authored by: Conservation Strategy Fund. Located at: https://youtu.be/X5yaXdTwfLE. License: All Rights Reserved. License Terms: Standard YouTube License