
15.4: Excel Table in Word Document
- Page ID
- 46676
\( \newcommand{\vecs}[1]{\overset { \scriptstyle \rightharpoonup} {\mathbf{#1}} } \)
\( \newcommand{\vecd}[1]{\overset{-\!-\!\rightharpoonup}{\vphantom{a}\smash {#1}}} \)
\( \newcommand{\dsum}{\displaystyle\sum\limits} \)
\( \newcommand{\dint}{\displaystyle\int\limits} \)
\( \newcommand{\dlim}{\displaystyle\lim\limits} \)
\( \newcommand{\id}{\mathrm{id}}\) \( \newcommand{\Span}{\mathrm{span}}\)
( \newcommand{\kernel}{\mathrm{null}\,}\) \( \newcommand{\range}{\mathrm{range}\,}\)
\( \newcommand{\RealPart}{\mathrm{Re}}\) \( \newcommand{\ImaginaryPart}{\mathrm{Im}}\)
\( \newcommand{\Argument}{\mathrm{Arg}}\) \( \newcommand{\norm}[1]{\| #1 \|}\)
\( \newcommand{\inner}[2]{\langle #1, #2 \rangle}\)
\( \newcommand{\Span}{\mathrm{span}}\)
\( \newcommand{\id}{\mathrm{id}}\)
\( \newcommand{\Span}{\mathrm{span}}\)
\( \newcommand{\kernel}{\mathrm{null}\,}\)
\( \newcommand{\range}{\mathrm{range}\,}\)
\( \newcommand{\RealPart}{\mathrm{Re}}\)
\( \newcommand{\ImaginaryPart}{\mathrm{Im}}\)
\( \newcommand{\Argument}{\mathrm{Arg}}\)
\( \newcommand{\norm}[1]{\| #1 \|}\)
\( \newcommand{\inner}[2]{\langle #1, #2 \rangle}\)
\( \newcommand{\Span}{\mathrm{span}}\) \( \newcommand{\AA}{\unicode[.8,0]{x212B}}\)
\( \newcommand{\vectorA}[1]{\vec{#1}} % arrow\)
\( \newcommand{\vectorAt}[1]{\vec{\text{#1}}} % arrow\)
\( \newcommand{\vectorB}[1]{\overset { \scriptstyle \rightharpoonup} {\mathbf{#1}} } \)
\( \newcommand{\vectorC}[1]{\textbf{#1}} \)
\( \newcommand{\vectorD}[1]{\overrightarrow{#1}} \)
\( \newcommand{\vectorDt}[1]{\overrightarrow{\text{#1}}} \)
\( \newcommand{\vectE}[1]{\overset{-\!-\!\rightharpoonup}{\vphantom{a}\smash{\mathbf {#1}}}} \)
\( \newcommand{\vecs}[1]{\overset { \scriptstyle \rightharpoonup} {\mathbf{#1}} } \)
\(\newcommand{\longvect}{\overrightarrow}\)
\( \newcommand{\vecd}[1]{\overset{-\!-\!\rightharpoonup}{\vphantom{a}\smash {#1}}} \)
\(\newcommand{\avec}{\mathbf a}\) \(\newcommand{\bvec}{\mathbf b}\) \(\newcommand{\cvec}{\mathbf c}\) \(\newcommand{\dvec}{\mathbf d}\) \(\newcommand{\dtil}{\widetilde{\mathbf d}}\) \(\newcommand{\evec}{\mathbf e}\) \(\newcommand{\fvec}{\mathbf f}\) \(\newcommand{\nvec}{\mathbf n}\) \(\newcommand{\pvec}{\mathbf p}\) \(\newcommand{\qvec}{\mathbf q}\) \(\newcommand{\svec}{\mathbf s}\) \(\newcommand{\tvec}{\mathbf t}\) \(\newcommand{\uvec}{\mathbf u}\) \(\newcommand{\vvec}{\mathbf v}\) \(\newcommand{\wvec}{\mathbf w}\) \(\newcommand{\xvec}{\mathbf x}\) \(\newcommand{\yvec}{\mathbf y}\) \(\newcommand{\zvec}{\mathbf z}\) \(\newcommand{\rvec}{\mathbf r}\) \(\newcommand{\mvec}{\mathbf m}\) \(\newcommand{\zerovec}{\mathbf 0}\) \(\newcommand{\onevec}{\mathbf 1}\) \(\newcommand{\real}{\mathbb R}\) \(\newcommand{\twovec}[2]{\left[\begin{array}{r}#1 \\ #2 \end{array}\right]}\) \(\newcommand{\ctwovec}[2]{\left[\begin{array}{c}#1 \\ #2 \end{array}\right]}\) \(\newcommand{\threevec}[3]{\left[\begin{array}{r}#1 \\ #2 \\ #3 \end{array}\right]}\) \(\newcommand{\cthreevec}[3]{\left[\begin{array}{c}#1 \\ #2 \\ #3 \end{array}\right]}\) \(\newcommand{\fourvec}[4]{\left[\begin{array}{r}#1 \\ #2 \\ #3 \\ #4 \end{array}\right]}\) \(\newcommand{\cfourvec}[4]{\left[\begin{array}{c}#1 \\ #2 \\ #3 \\ #4 \end{array}\right]}\) \(\newcommand{\fivevec}[5]{\left[\begin{array}{r}#1 \\ #2 \\ #3 \\ #4 \\ #5 \\ \end{array}\right]}\) \(\newcommand{\cfivevec}[5]{\left[\begin{array}{c}#1 \\ #2 \\ #3 \\ #4 \\ #5 \\ \end{array}\right]}\) \(\newcommand{\mattwo}[4]{\left[\begin{array}{rr}#1 \amp #2 \\ #3 \amp #4 \\ \end{array}\right]}\) \(\newcommand{\laspan}[1]{\text{Span}\{#1\}}\) \(\newcommand{\bcal}{\cal B}\) \(\newcommand{\ccal}{\cal C}\) \(\newcommand{\scal}{\cal S}\) \(\newcommand{\wcal}{\cal W}\) \(\newcommand{\ecal}{\cal E}\) \(\newcommand{\coords}[2]{\left\{#1\right\}_{#2}}\) \(\newcommand{\gray}[1]{\color{gray}{#1}}\) \(\newcommand{\lgray}[1]{\color{lightgray}{#1}}\) \(\newcommand{\rank}{\operatorname{rank}}\) \(\newcommand{\row}{\text{Row}}\) \(\newcommand{\col}{\text{Col}}\) \(\renewcommand{\row}{\text{Row}}\) \(\newcommand{\nul}{\text{Nul}}\) \(\newcommand{\var}{\text{Var}}\) \(\newcommand{\corr}{\text{corr}}\) \(\newcommand{\len}[1]{\left|#1\right|}\) \(\newcommand{\bbar}{\overline{\bvec}}\) \(\newcommand{\bhat}{\widehat{\bvec}}\) \(\newcommand{\bperp}{\bvec^\perp}\) \(\newcommand{\xhat}{\widehat{\xvec}}\) \(\newcommand{\vhat}{\widehat{\vvec}}\) \(\newcommand{\uhat}{\widehat{\uvec}}\) \(\newcommand{\what}{\widehat{\wvec}}\) \(\newcommand{\Sighat}{\widehat{\Sigma}}\) \(\newcommand{\lt}{<}\) \(\newcommand{\gt}{>}\) \(\newcommand{\amp}{&}\) \(\definecolor{fillinmathshade}{gray}{0.9}\)Learning Objectives
- Create a Word document with integrated Excel table.
There are a couple of ways to integrate an Excel table into a Word document.
Option 1 for Table Integration
Rosamine starts to type in her report. Along the way she decides to change the theme colors again to more of a brown color and repeats the theme change process like she did previously. She continues writing her text and now needs to add an Excel table to her report highlighting the three different store Q2 sales numbers.
She has the second quarter sales information from another report, but doesn’t have the Excel file itself to copy into her Word document. Because she has no existing Excel file, she creates her own table through the following steps:

- Cursor Placement. Rosamine makes sure her cursor is placed in the area of her Word document where she wants to create the table.
- Insert Tab. She clicks on the Insert tab to display the insert button possibilities and selects the Table button.
- Excel Spreadsheet Option. This button creates a little Excel spreadsheet table within Rosamine’s Word document.
The Excel table is now in her Word document and ready for data to be entered. Notice how the color of the upper toolbar is displaying the Excel green and that the Home tab is selected. This is an indicator to Rosamine to know she is now working with an Excel table. She can now begin to type in the data for the table.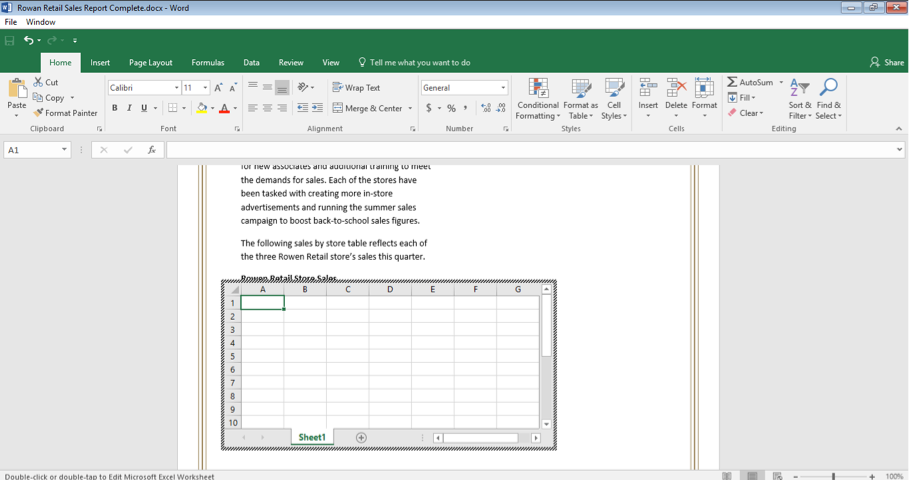
Note: If at any time Rosamine clicks outside the table it will revert back to the Word document and she can double-click back on the table to open it up for data entry again.

Rosamine has entered the sales figures from the three different stores, and wants to make additional changes to the table. This is how she changes the table.
- Cell Style. Rosamine selects and formats the column of numbers to be currency cells and to display the dollars generated from sales for the second quarter of the year.
- AutoSum. With the bottom cell selected, Rosamine clicks the AutoSum button, which totals the three sales figures for all stores for the GM to easily see what total sales were generated from the second quarter.
- Center. Next, Rosamine centers the Quarter numbers by selecting the three quarter cells and clicking on the centering button.
- Color in Cells. The table needs a contrasting color to make the titles and totals stand out. Rosamine selects the top and bottom rows, clicks on the paint bucket button, and chooses a green color for the table.
- Borders. To make the table look more defined in the document, Rosamine selects the entire table, then the Border button, then selects the “thick box border” to be placed around the outside of the table.
- Bold. The last table change Rosamine uses is to select the titles and totals rows and bold each of them to contrast with the other data.
Now the table is complete, but it still shows too many unused cells. Rosamine resizes the table by holding down the left mouse button and dragging the sides of the table to the correct size for the report.
Her work complete, she clicks off to the right. Her Word document is ready for more text and additional data.
Option 2 for Table Integration
What if Rosamine has access to the store sales information Excel file directly? With this scenario, she can place it directly into her Word document with no need to make her own table. Here is how Rosamine can insert an existing Excel file:

- Word Document Open. Rosamine has the Sales Report Word document open on her computer.
- Excel Application Open. Rosamine opens the Excel app.
- Excel Document Open. Next, Rosamine opens the Rowan Retail_Q2_Sales_Totals file.
- Sales Table. This is the sales table to be copied into the Word document. The next step is to copy and paste the table.

- Select Table. With the file open, Rosamine selects the entire table (all rows and columns).
- Copy Table. Rosamine right-clicks with her mouse and selects the Copy function. She can also accomplish this by using the Ctrl+C keys to copy the table.
Next is getting back to the Word document. There are three ways to accomplish this:
- One way is to simply click on the Word window and it will move forward in front of the Excel window.
- A second way is to toggle back and forth with the keyboard by holding down the Alt key and tapping on the Tab key (Alt+Tab). This opens a small window displaying all the apps currently running on the computer. She can continue to hold down the Alt key and click the Tab key to scroll through the options.

- The third option is to place the two documents side-by-side on the computer screen. This typically requires resizing of the document windows.
Now that the Word document is selected, Rosamine now places the cursor where the table should be and right-clicks with her mouse. The menu appears again. She selects the Paste Option small clipboard icon, and the table is copied into the Word document.

This is how the document looks with the Excel table pasted into the document.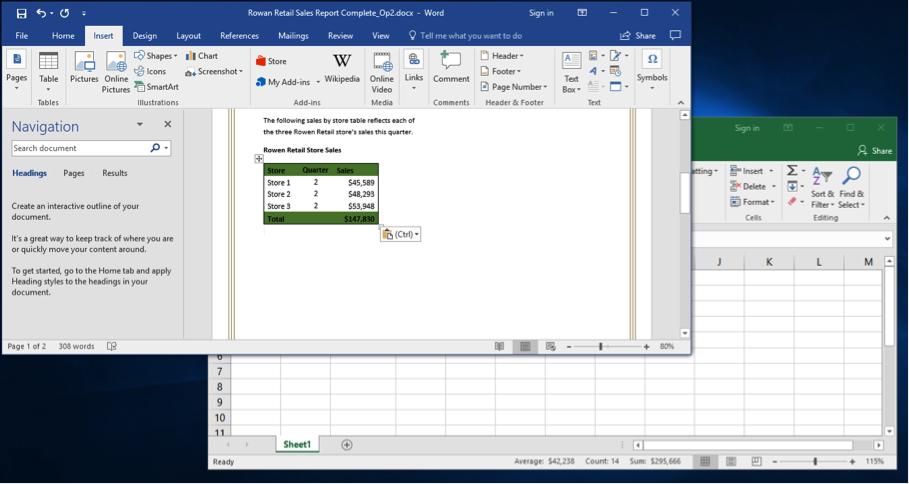
Here is an illustration of copy and pasting using the keyboard shortcut keys (Ctrl+C, Ctrl+V) where Rosamine would first select the Excel table, copy the table, then paste it into the Word document.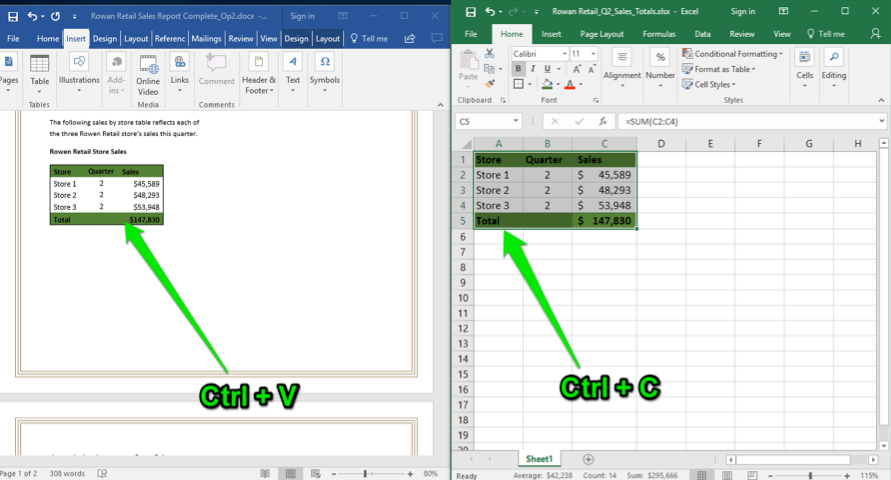
Once the copied Excel table is in the Word document, it can be modified by double-clicking in the desired cell and then it can be changed however desired. It does not open a small Excel spreadsheet as the table created within Word in Option 1 did.
The table is now set and Rosamine is ready for more text and an additional data chart.
Contributors and Attributions
- Excel Table in Word Document. Authored by: Sherri Pendleton. Provided by: Lumen Learning. License: CC BY: Attribution